
Homeowner’s Guide to Stormwater, Buffers, and Lot Drainage
This guide has been designed to answer questions homeowners like you may have about their homes and the County’s stormwater program, buffers and drainage.
What is “stormwater?”
Stormwater is rainfall that doesn’t soak into the ground. Trees, grass and other plants help rainfall soak into the soil. Pavement, concrete, rooftops and other hard surfaces keep rainfall from soaking into the soil, causing more rainfall to run off. Development, including building houses and roads, increases stormwater runoff.
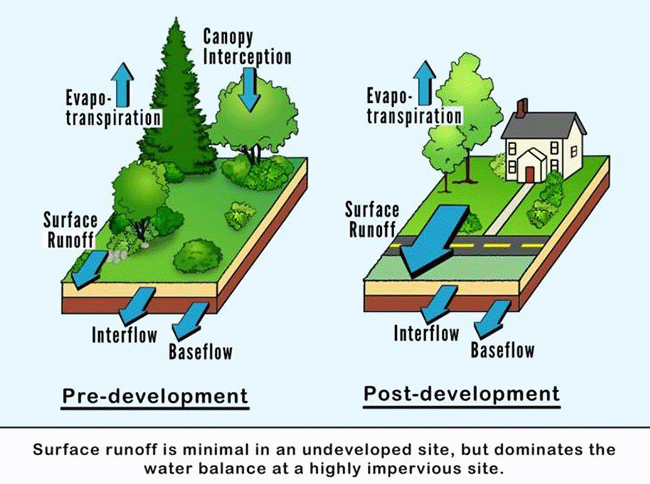
Johnston County regulates stormwater runoff and sediment and erosion control for new development and riparian buffers along streams and other waterbodies. This guidance document provides information about how these programs may affect private property. See the color-coded sections identified below for easy navigation. The County’s policies and procedures related to each subject are in their respective sections.
Impervious surfaces/Built upon area
In Section 1 - Impervious Area/Built Upon Area, learn about possible restrictions on the amount of hardened surfaces on your property. In addition, you can find practices that are easily installed to allow you to increase the amount of hardened surface on your lot!
Riparian buffers
Section 2 - Riparian Buffers describes the benefits provided by stream and pond/lake buffers, as well as the types of activities allowed in them
Drainage easements
Section 3 - Drainage Easements contains useful information for property owners and homeowners’ associations regarding the intent of drainage easements on lots.
Natural features
Section 4 - Natural Features describes how existing natural areas help protect streams and wetlands and how they often function as “sponges” for runoff.
Section 1 - Impervious surfaces/Built upon area
Some subdivisions and lots have limitations on the amount of impervious surface or built upon area that is allowed. This section describes what impervious surfaces/built upon area means, why it matters, and how a property owner can increase the amount of impervious surfaces/built upon area on his/her property.
1.1 What are “impervious surfaces/built upon areas?”
Impervious surfaces/built upon areas include all hardened or impervious surfaces that prevent rainfall from soaking into the soil. The following surfaces are NOT considered impervious surfaces and do NOT have to be included in the built upon area for your lot:
- a slatted deck
- the water area of a swimming pool
- a surface of number 57 stone, as designated by the American Society for Testing and Materials, laid at least four inches thick over a geotextile fabric
- a trail as defined in G.S. 113A-85 that is either unpaved or paved (as long as the pavement is porous with a hydraulic conductivity greater than 0.001 centimeters per second (1.41 inches per hour))
- landscaping material, including, but not limited to, gravel, mulch, sand, and vegetation, placed on areas that receive pedestrian or bicycle traffic or on portions of driveways and parking areas that will not be compacted by the weight of a vehicle, such as the area between sections of pavement that support the weight of a vehicle.
Note that the definitions of BUA and surfaces that are NOT impervious are set by the state regulator, NCDEQ. Johnston County must follow these requirements.
For the purposes of this manual, impervious surfaces and built upon area are interchangeable.
IMPORTANT! Approval from the County to exceed the BUA limit is ONLY REQUIRED under the following circumstances:
• The addition of BUA requires a building permit from Johnston County, AND
• The BUA restriction is recorded on your subdivision plat.
1.1.1 How do I know if I have a built upon area limit or restriction?
Built upon area restrictions can be found on a copy of the subdivision plat for your lot or in your subdivision’s restrictive covenants. If the BUA restriction is on the plat, approval from the County is required prior to exceeding the BUA amount. If the BUA restriction is in the restrictive covenants, approval from your homeowner’s association may be required prior to exceeding the BUA amount.
To determine if your lot has a BUA restriction recorded on the subdivision plat, look for the plat book and page on your property deed. If you don’t have a copy of your deed, you can research your deed with the Register of Deed’s office, either in person in the Johnston County Register of Deed’s office in Smithfield or online at the Register of Deed’s website. Navigate to the Register of Deeds website here: http://www.johnstonnc.gov/rod/.
Once there, choose “online records search” and “public users” and read and acknowledge the disclaimer. Then you will be directed to the Register of Deeds document search engine with multiple search options. Figure 1 shows the document search website with helpful navigation hints added in green.
Figure 1. Register of Deeds Document Search for Deeds

Click on the down arrow under “Is Human” and select “human.” Insert the last name of lot owner in the “Surname” box. Then click on “search” above. This type of search will yield all types of documents under the owner’s name. Look for “deed” in the far-left column and click on the one that corresponds to your lot. Once the next window comes up, click on the “view attachment” link under “Document Images” on the far left, as shown in Figure 2 below.
Figure 2. Viewing Property Deeds

Read the deed to find the plat book and page numbers to enter into the next search. Return to the “Document Search page of the Register of Deeds’ website and begin your plat search. See Figure 3 to find the search boxes.
Figure 3. Register of Deeds - Plat Book Search

Under the “Book Type” search box, there is a pulldown menu. Click the down arrow to reveal the different document types that can be searched. Choose “PLAT – plat books” in the pulldown menu. Then input the plat book and page number and click “search.” Scroll down to reveal the plat image and check for “impervious area” or “built upon area” restrictions.
Note: A plat contains useful information about a development and lots, such as impervious area or built upon area, easements, setbacks, stream buffers and identified wetlands for the development.
1.1.2 What if I want to exceed the maximum impervious area recorded on my plat?
During the development process, developers are required to design stormwater management plans that treat stormwater runoff quality and quantity. In Johnston County, the design of stormwater quality management plans must adhere to the State’s Neuse Nutrient Sensitive Waters Management Strategy and Neuse Rules. Examples of treatment practices include stream, wetland and pond riparian buffers; impervious surface or built upon area limitations; wet or dry ponds; vegetated filters; bioretention areas; and other structural controls. Typically, the stormwater management plan is developed for the entire development, including impervious area or built upon area restrictions. In residential development, estimations of impervious surfaces or built upon area for each lot are provided in the development plans and can be recorded on the approved subdivision plat, the subdivision’s restrictive covenants and/or on the property deed. When a homeowner applies for a building permit and through the permit process finds that they are going to exceed their recorded BUA restriction, lot level stormwater devices allow a homeowner to exceed the maximum impervious area or built upon area approved for their lot.
If you want to exceed the recorded maximum impervious area or built upon area for your lot, you have two options:
Option 1: Check with your developer or Homeowner’s Association to determine if there is a managed “bank” of impervious area or built upon area. Some developers include an unused amount of impervious area or built upon area in their initial development to allow for future expansions on lots.
Option 2: Design and install stormwater devices to treat the excess stormwater for the extra impervious area or built upon area. Allowable lot level stormwater control measures include a rain garden or rain barrels. See section 1.4 for more information on these measures. If a homeowner chooses to install a different stormwater device, an engineer will be required to design the device and oversee installation. Please note that all forms of permeable pavement are not allowed by the county.
1.2 Policies and procedures to allow recorded built upon area restriction exceedance
This section outlines the County procedures and policies related to exceeding the recorded built upon area on single family residential lots.
Option 1: Banked impervious area in development managed by developer or owners’ association.
- If your development has banked or excess built upon area, petition the developer or owners’ association for approval of the exceedance.
- Once the new built upon area exceedance has been approved, re-record your plat with the new built upon/impervious area maximum. A surveyor will need to help with this process. A plat contains useful information about a development and lots, such as impervious area or built upon area, easements, setbacks, stream buffers and identified wetlands for the development. 7
- The new plat will be reviewed and must be approved by the County prior to recording. Provide documentation of the built upon/impervious area approval by the built upon/impervious area bank manager (usually, the developer or the owner’s association).
Option 2: Lot level stormwater devices to treat the overage.
- Design lot level stormwater devices to treat the overage amount. (See the next section for more information on the design, operation and maintenance of these measures.)
- Identify where the device(s) is to be installed. Ensure that the setbacks in section 1.3 are met.
- Develop and submit your lot level plan.
- Develop a to-scale drawing showing the location of the stormwater device relative to septic areas, structures, and property lines. As an alternative, have an engineer or surveyor draw up the plan.
- Complete the Homeowner’s Lot Level Stormwater Application form and the accompanying Homeowner Design worksheet. See the appendices for the forms and policies.
- Submit the drawing, application and worksheet to the Stormwater Manager.
- Once the Lot Level Stormwater Plan has been approved, you can build the stormwater device on your lot. Submit pictures to the Stormwater Manager.
- Once the installation is complete, work with a land surveyor to develop a plat showing your lot with the stormwater device located in a stormwater drainage easement with the new approved built upon area included on it. This plat must then be recorded with the Register of Deeds.
- Conduct routine inspections on the stormwater device to ensure it is properly functioning.
Note: Be sure to rerecord your plat with the new impervious area limit on it to prevent potential delays during the sale of your home. Lots that exceed the recorded maximum impervious area are not in compliance with the County’s stormwater program.
1.3 Policies and procedures for designing lot level stormwater devices
This section outlines the County procedures and policies related to single family residential lot building permits where the recorded BUA limit will be exceeded. Note that these policies and procedures do NOT apply to initial builds by homebuilders.
- Treatment required. Where the maximum built upon area recorded on a plat has been exceeded or where it will be exceeded, the area of overage must be treated with a lot-level stormwater device.
- Offset treatment. Either the overage area of the built upon area or an equivalent existing built upon area must be treated. Example: A homeowner wants to add a concrete patio that is 200 square feet. The maximum built upon area for the lot recorded on the plat is 3200 square feet, and the existing built upon area for the lot is at the maximum. A stormwater device must be designed to treat 200 square feet of built upon area – either for the patio or for an equivalent area of built upon area on the lot (a portion of the house roof, driveway, etc.).
- Drainage easements, re-recording. All lot level stormwater devices must be located within a drainage easement. In addition, once the Lot Level Stormwater Plan has been approved, the tract plat or subdivision plat must be re-recorded with the Register of Deeds office to clearly show the revised maximum built upon area and all drainage easements.
- Operation and Maintenance Schedule. The operation and maintenance schedule statement specific to each device type must be included on the re-recorded plat.
- Rain Barrel Operation and Maintenance Schedule: Inspect the rain barrel(s) after each significant rain event for the following:
- Empty the rain barrel storage as soon as possible after a rain.
- Check to make sure the barrel inlet isn’t blocked.
- Replace barrel components that are deteriorated.
- Rain Garden Operation and Maintenance Schedule: Inspect the rain garden after significant rains and perform the following if needed:
- Remove litter and debris from the rain garden area.
- iReplace any dead or diseased plants. iii. Replace mulch as needed.
- Repair any areas that are bare and eroding.
- Rain Barrel Operation and Maintenance Schedule: Inspect the rain barrel(s) after each significant rain event for the following:
- Engineered designs. The devices outlined in this document can be easily designed by a homeowner. If a homeowner chooses to install a different stormwater device, an engineer will be required to design the device and oversee installation. Please note that all forms of permeable pavement are not allowed by the county.
- Setbacks. For lot level stormwater treatment devices except rain barrels, the following setbacks apply:
- Lot level stormwater treatment devices must be located at least 25 feet from septic systems (including the drain field) and septic repair areas.
- Lot level stormwater treatment devices must be at least 10 feet from property lines.
Designing lot level stormwater devices
The following stormwater devices can be installed by homeowners to treat excess built upon area/impervious surfaces beyond the limit approved for your lot.
- Rain garden
- Rain barrel
1.4 Rain Gardens
A rain garden is a garden shaped into a bowl-like depression in the ground to capture rainfall runoff from your rooftop and driveway and allow water to filter into the ground. The plants, mulch and soil in a rain garden combine natural processes to filter pollutants from runoff and break them down in the soil over time. This device is designed to allow water to soak into the soil instead of running off built upon area/impervious surfaces.
Figure 4. Simple rain garden (photo courtesy NCSU Cooperative Extension

Rain garden benefits include:
- Easy to design, install and maintain.
- Aesthetically pleasing in the residential landscape
- Provide habitat for pollinators and wildlife
- Absorb nutrients and other pollutants
Minimize runoff and maximize infiltration Ideally, sandy loam soil is best for rain gardens. However, more slowly draining soils work, too. Plant choice should be adjusted if soils contain more clay. In most soils, runoff captured in the rain garden will drain in less than 3 days. (Note: a wetland garden would allow a garden to pool longer than 3 days and will include wetland plants.)
Will water stand in my rain garden?
Yes, after a rain event, there will be water in your rain garden. The rain garden may even be flooded. But that’s okay! The garden is designed with a temporary water ponding storage area of 6-9” of runoff for 3 days or less. The ponded water will slowly infiltrate into the soil, as designed.
Are rain gardens a breeding ground for mosquitoes?
Not if they are properly draining. Most mosquitoes require about a week to complete a life cycle. Your rain garden should drain in 3 days. Also, rain gardens attract dragonflies, which eat mosquitoes! You could also consider adding a bat box close to the rain garden to eat mosquitoes and other insects. (For more on bat boxes: http://www.batcon.org/resources/getting-involved/bat-houses)
Is a rain garden expensive?
It doesn’t have to be! The main cost will be purchasing the plants and mulch. You can even opt for grass instead of mulch and plants. Note that if grass is installed in the rain garden, mow Bermuda at 3” and fescue at 4” high.
Designing a rain garden
Step 1: Locate the rain garden.
Observe your yard during a rainfall event. Determine where water begins flowing and where it is going. Rain gardens should ideally be located between the source of runoff (roofs and driveways) and the runoff destination (drains, streams, low spots, etc.). Be sure to consider the following:
- IMPORTANT: Do not place rain garden uphill of homes, septic systems or wellheads!
- Locate at least 25’ away and downslope from septic systems and septic repair areas.
- Locate at least 10’ away from property lines.
- Locate at least 10’ away and downslope of the house foundation, if crawlspace or basement (if home is on a slab, locate downslope of foundation).
- Locate 10’ away and downslope of a wellhead.
- Avoid underground utility lines by identifying them BEFORE you dig (Call 1-800-632-4949 or 811 in NC).
- The best location for the garden will be in partial to full sun (at least 4 hrs. of sunlight).
Step 2: Determine drainage of soils.
Rain gardens work best when constructed in well-drained soils, but they can also be installed on sites with less permeable soils with more clay content. Determining how the soil drains will help determine the type of plants most likely to succeed in the rain garden.
Pick a few places where you expect to build the rain garden and dig a one-ft-deep hole for the preliminary infiltration test; then fill with water a few times. Time how long it takes for the test pit to drain. If satisfied with drainage time, dig 2-3 more one-ft-deep holes in that area to get an average drain time. CAUTION: In floodplain areas or East of I-95, dig two-ft-deep holes where high water tables are probable (highest in winter). Conduct drainage tests at least twice at each hole.
Note: Consider sending off some of the soil dug out of the wells for the infiltration testing to have the soil fertility tested. Get your soil test forms, boxes, and testing information here: https://www.ncagr.gov/agronomi/uyrst.htm
The table below summarizes what type of practice to use based on drain time.
| Drain time | Appropriate Rain Garden Type |
|---|---|
| < 12 hours | Quick draining rain garden |
| 12-72 hours | Standard rain garden |
| > 72 hours (3 days) | Wetland garden |
Signs of impermeable, compacted, or wetland soils include:
- The site ponds water or remains saturated for 4 days or more after a rain event.
- Water poured in the test hole is still there 4 days later and it hasn’t rained.
- The soil is gray with ribbons or areas of brown color and/or smells like rotten eggs.
Step 3: Size the rain garden.
The amount of newly built upon area (roof top, driveway, patio) that exceeds your current impervious limit needs to be treated by the rain garden. The built upon area should drain to the rain garden location. The size of the rain garden should be at least 10% of the size of the built upon area draining to the rain garden. The treatment goal is the first one inch of runoff from the built upon area, so rain gardens should be designed to pond 10 inches of rainwater on top of the mulch. Rain gardens that are 10% of the built upon area size and have a 10” ponding depth should capture the majority of one-inch storms. Follow the instructions on the Homeowner’s Design Worksheet for Rain Gardens to determine appropriate dimensions for your rain garden. You may be able to determine the amount of built upon area yourself, or you may have to consult your contractor or surveyor.
Figure 5. Rain garden example

Example: The carport was added to this house site. The roof of the carport is 25’ long and 15’ wide. What size should the rain garden be?
Roof length 25’ x roof width 15’ = built upon area of 375 sqft 375 sqft x 0.10 = 37.5 sqft
The garden must have an area of at least 37.5 square feet.
The rain garden could be 10’ x 4’ (40 sqft), 5’ x 8’ (40 sqft) or 6’ x 7’ (42 sqft).
Note: Consider the space that is available on your lot, as well as setbacks from property lines, septic systems, wells, etc.
Step 4: Get your rain garden approved.
Complete the Homeowner Lot Level Stormwater Application and Design Worksheet for Rain Gardens (see Appendix) and submit them to the county’s Stormwater Manager along with a site plan that clearly shows the location and dimensions of the rain garden. The site plan may be created by you or a surveyor.
Once approved, you may begin construction. Contact a surveyor to draw your rain garden within a drainage easement on your plat with the new impervious surface/built upon area limit indicated on it. Have the revised plat, including the Operation and Maintenance Schedule, recorded with the Register of Deeds office.
Step 5. Construct your rain garden.
Consider how rainwater gets to your rain garden. Will the water sheet flow across the landscape? Will the water be piped underground to daylight into the rain garden? Lay out the boundary of the garden to keep the shape. You can use a rope, spray paint or even flags to outline your shape. Keep in mind how you determined the infiltration time-period in Step 2 above.
NOTE: Always determine where utility lines are located BEFORE you start to dig. CALL 811!
Helpful tools:
- Auger
- Tamper
- Tape measure
- Wheelbarrow
- Shovels or backhoe
- Line level or ruler
- Rakes
- Stakes and string
- Pitchforks
- Tarp
- Trowels
- Extra labor
Figure 6 Soil profile

Start digging!
- Remove and save sod for the berm and weir.
- Remove topsoil. Don’t know what topsoil looks like? See Figure 6.
- Dig to account for 10” ponding depth.
- Dig to account for 3” of mulch.
- Rough up 4-6” of the bottom so it is not compacted and mix in topsoil removed earlier. This will not only improve drainage but help plants survive. Apply lime based upon your soil test.
Leveling the rain garden
- One way to check the level of the rain garden is to just “eyeball” it. To do it more accurately follow these steps:
- When the whole area has been dug out to about the right depth, lay the 2x4 board in the rain garden with the carpenter’s level sitting on it. Find the spots that aren’t flat. Fill in the low places and dig out the high places.
- Move the board to different places and different directions, filling and digging as necessary to make the surface level.
- When the rain garden is as level as you can get it, rake the soil smooth.
- Use any excess soil for the berm on the downhill side.
Figure 7. Example of leveling the rain garden area (photo courtesy Wisconsin DNR Rain Garden How to Manual for Homeowners)

Rain garden entrance
Establish a 1’-2’ grass strip, rock border or combination along the upper edge of the rain garden to slow down the runoff water as it enters the rain garden. If you are piping downspouts to the rain garden, make sure the pipe opens up into the rain garden and is not buried. Also make sure that the downspout has a splash pad or area of rock to dissipate energy before flowing into the rain garden.
Figure 8. Rain Garden showing a downspout, splash pad, grassed strip and berm (photo courtesy Wisconsin DNR)

Forming the berm and weir
Your rain garden is designed to capture the first one inch of runoff. Rainfall beyond that will cause the rain garden to overflow, as that is how the rain garden is designed to function. Therefore, rain gardens should have very distinct entrances and exits, protected against erosion.
Figure 9. Rain garden construction showing the berms and weir being constructed (photo courtesy of N.C. Community Conservation Assistance Program Design Manual: Backyard Rain Garden Design)

You will have lots of soil available from digging. Place extra soil on the downhill side of the rain garden to create a berm, an earthen dam or barrier that holds water inside. Most rain gardens have berms about 3” - 6” tall. Compact the soil slightly with your feet or shovel as you build the berm. Cover with turf grass sod, mulch, plants, or rocks.
You will need to design a weir, or nature will do that for you. A weir is an area of the berm that allows water to gently pass over it. Typically, weirs are a one-foot-wide section of the berm several inches lower than the rest of the berm. To properly size the weir, use the amount of impervious surface area (see table below). Weirs can be covered with turf grass sod or rocks; additionally, they can be made of wood. Make sure the weir is level and lower than the rest of the berm.
Figure 10. Guilford County Extension rain garden wooden weir (photo credit: NC Extension)

Weir sizing: Use the following chart to determine how wide your overflow weir should be.
| Impervious surface/Built upon area treated (ft²) | Overflow weir length (ft) |
|---|---|
| 2000 or less | 1 |
| 3000 | 1.5 |
| 4000 | 2 |
| 5000 | 2.5 |
Adding plants Pick your plants based on how your soil drains so you are working with nature instead of against it. Below are example rain garden plans.
Drains in less than 12 hours

Drains in 12 hours to 3 days

Drains in more than 3 days

Once plants have been installed, add 3” of double or triple shredded hardwood mulch. Avoid burying the crowns of the new transplants. Mulching is usually not necessary after the second growing season unless the “mulched look” is desired.
Step 5: Water and weed the rain garden
Make sure the rain garden is watered every 7-10 days without adequate rainfall (at least 1 inch) in the first year. Once established, plants will only need to be watered during droughts.
Weeding will be needed in the first couple of years. Remove by hand only those plants you are certain are weeds. Try to get out all the roots of the weedy plants. Weeds may not be a problem in the second season, depending on the variety and tenacity of weeds present. In the third year and beyond, your plants should be thriving and will likely out-compete weeds. Weeding isolated patches might still be needed on occasion.
Look for areas of erosion in and around the rain garden. Get those areas stabilized with vegetation or rock. Remove dead or diseased plants as soon as they are observed. It may be necessary to lift and divide plants that are crowding out other plants.
1.5 Rain Barrels
A rain barrel captures rainwater from your roof to reduce runoff from your property and provide you with water for lawns and gardens. Rain barrels can easily be installed at gutter downspouts but can also be installed when there are no downspouts. This section describes how to determine the number of rain barrels, how to place the rain barrels, and their operation and maintenance.
1.5.1 Determining the number of barrels
- When you are treating excess built upon area, the barrel(s) must be sized to capture the first 1 inch of rain from off the excess built upon area. Use the following steps to determine how many barrels you will need.
- Determine the surface area of built upon area that must be treated, either on your own or by asking your contractor or surveyor.
- Determine the volume that must be captured by the rain barrel(s). The minimum required volume to be captured is one twelfth (1/12th) of a cubic foot of rainwater per square foot of built upon area.
- BUA ÷ 12 = required volume in cubic feet
- Most rain barrels give the holding capacity in gallons, so cubic feet must be converted to gallons:
- There are 7.48 gallons in one cubic foot
- Volume in cubic feet x 7.48 = volume in gallons
- Choose the size of the rain barrel(s) and determine how many are needed. Ready-to-go rain barrels that are commercially available vary in size – typically 50-65 gallons, but also smaller and larger.
- Volume in gallons ÷ barrel size = number of barrels (round up to the next whole number)
- Address the overflow. Be sure to note where the overflow will go during large storms. Avoid directing the overflow next to building foundations. Plan to use a splash guard, install a soaker hose, or build a slight swale to direct overflow away from your home and into an area where it can be absorbed, such as a naturally vegetated area.
1.5.2 Rain barrel installation
Figure 12. Rain barrel installed under gutter-less roof

A full rain barrel is very heavy! Think through where and how to install the rain barrel before it begins to capture rain.
- Level the area. Once you have determined where you want your rain barrels to go, level the ground surface. You can use crushed stone or mulch to stabilize the ground.
- Install blocks or stand. Elevating the rain barrel is necessary to allow room for a watering can, bucket, or hose attachment under the spigot. Elevating the barrels will also create stronger water pressure. Place the blocks or other materials to create a stand on the leveled ground and recheck for level. Adjust as needed to achieve level.
- Connect the downspout to the rain barrel. Cut the gutter with a hand saw and install the diverter according to the instructions, at a height that allows the water to flow from the diverter into the barrel. If not using a flow diverter, the gutter downspout can be directed or connected directly to the barrel.
- Install the rain barrel.
- Place the rain barrel on the blocks or stand.
- Direct flow from gutter downspout or rain chain into the barrel.
- Cover the open top of the rain barrel with screen to prevent mosquitoes from breeding in the standing water and to reduce the amount of debris entering the barrel. Most rain barrels that you purchase pre-made will come with a screened cover.
- Direct the overflow from the rain barrel to a vegetated area, where it can soak into the ground.
- Install a hose, drip irrigation, or other drawdown mechanism.
Note: Without gutters, you can collect rainwater in the corners of your eaves where rain naturally concentrates or utilize a rain chain to direct water into the barrel.
1.5.3 Maintenance
Rain barrels only work when they have space to store rainfall before the next storm, so the most important maintenance activity is to inspect the barrel after a rain event to determine how much was captured and can be released before the next rain. Use the captured rainfall to water plants outside, wash the dog, drip irrigation for gardens, etc. Captured water cannot be used as drinking water or plumbed into the house plumbing without additional engineered design and County approvals.
Draw down the rain barrel when temperatures are expected to fall below freezing.
Check the screen for trash and debris (leaves, pine needles, sticks, etc.) that might block the flow of water. Remove the trash and debris.
Riparian Buffers
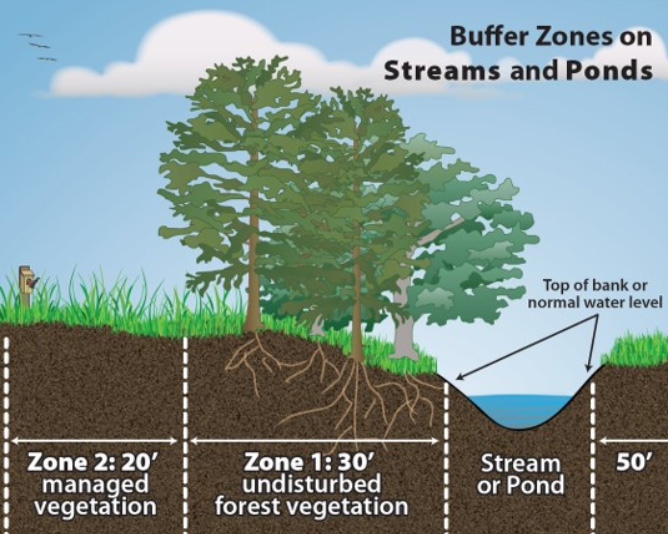
In the late 1990’s, regulations were developed for the Neuse River Basin to protect streams and other waterbodies from pollution. Those regulations established “no touch zones”, or riparian buffers, along all streams, ponds, and lakes. A riparian buffer is a strip of forested or vegetated land bordering a body of water. The vegetation and root systems in a riparian buffer stabilize the streambank, preventing soil from eroding into the water. Riparian buffers also act as filters to remove pollutants. Preserving riparian buffers is critical to protecting our water resources. If you have a waterbody on your property, the area 50 feet wide and along the stream, pond, or lake is considered a protected riparian buffer. The buffer is broken into 2 zones, as shown in Figure 13 below. Zone 1 is 30 feet wide and cannot be undisturbed. Zone 2 is 20 feet wide and can be disturbed and restabilized with grass or other vegetation. Figure 13 shows the locations and vegetation makeup of the two zones. No hardened surfaces (impervious area or built upon area) can be placed in either zone of the riparian buffer.
Note: Stream bank erosion can cause loss of property. Riparian buffers are a great, natural method of protecting stream banks from significant erosion and the associated loss of property.
The benefits of riparian buffers are maximized when there is diffuse flow of stormwater runoff. Diffuse flow is overland water flow that is spread out over the landscape, not concentrated into a defined channel. Diffuse flow is required on all buffered streams, regardless of property size or type of land use. It must be achieved before stormwater runoff enters the riparian buffer from any new ditch or manmade conveyance. Diffuse flow may be achieved by installing a level spreader or other diffuse flow device. Level spreaders and other devices must be designed according to the N.C. Stormwater BMP Manual (https://deq.nc.gov/about/divisions/energy-mineralland-resources/energy-mineral-land-permit-guidance/stormwater-bmp-manual).
In Johnston County, staff with the Public Utilities Department have been trained to identify features that must have riparian buffers and approve or disapprove activities within those buffers.
Figure 13. Riparian buffer zones (Graphic courtesy of NC Department of Environmental Quality)
How do I know if I have a riparian buffer on my property?
If your lot is part of a subdivision developed after 1997, your subdivision plat will have riparian buffers identified on it if they apply. If your property is not part of a subdivision and/or you have a stream or pond on it, contact the Public Utilities Department for more information.
What activities are allowable in riparian buffers?
A homeowner can do the following in riparian buffers without having prior approval from Johnston County:
- Install playground equipment (such as a swing set) as long as the existing vegetation isn’t damaged.
- Remove invasive plants, poison ivy, or dead or diseased vegetation.
- Mow Zone 2.
- Planting vegetation to enhance the riparian buffer.
Drainage Easements
A drainage easement is an area where runoff is expected, such as in a drainage swale, ditch or pipe. As such, the homeowners’ association or property management company have limited rights of access and/or use of this area to make sure the drainage system is functioning correctly. Generally, you cannot make any improvements in a drainage easement. That means no fences, sheds, walls, trails or buildings. You should avoid planting trees or much landscaping as well. You can, however, maintain the grass or existing areas of rock in a drainage easement.
A drainage easement has two possible purposes. It may be needed for the flow of stormwater. For example, drainage ditches and swales are typically within a drainage easement. In this case, anything that prevents the flow of water; that might catch debris like leaves and branches; that might be washed away; or that might cause a dam-like effect is not allowed in the drainage easement. Alternatively, the easement may be needed to access other drainage components. In this case, anything that might make it difficult to drive a truck through or dig up an underground pipe (like a fence or row of shrubbery) is problematic.
Note: Johnston County does not maintain any drainage easements or stormwater structures located within an easement. Instead, these drainage areas are maintained by a property owner or homeowners’ association. If you have concerns about the condition of a drainage easement, contact the homeowners’ association or property owner.
Drainage easements are required for any development that creates public or private drainage facilities. The responsibility for maintenance of drainage easements and any structures located within the easements is the landowner, developer, property owners’ association or other person or association as noted in the stormwater application. It is the responsibility of the developer to clearly indicate who is responsible for maintenance of proposed drainage facilities.
I have a drainage easement on my property plat. What does that mean?
Drainage easements let the property owner or purchaser know to expect runoff to flow in the general area. This information is useful to prevent owners from placing patios, pools, storage sheds and fences in these areas and causing damage to the property.
What can I do in a drainage easement?
If the drainage easement is on your property, treat it the same as your yard – mow and maintain the grass. However, don’t place a fence across or in the easement that blocks drainage. Maintain the grass or other vegetation in the drainage easement, so it doesn’t erode over time. If playground equipment or other items are placed in or near the drainage easement, make sure that water can flow through or around it and won’t wash away items.
Figure 14 shows a fence installed in a drainage easement along the backside of lots without providing for flow under the fence. Water will back up on the upgradient side of the fence and likely cause the fence to rot more quickly along the bottom. Figure 15 is of a shed built without a building permit in a drainage swale in a drainage easement. Any structures placed in drainage easements that cause water to back up or flood a property are not allowed.
Figure 14 Drainage easement with fence

Figure 15 Drainage easement with building

Drainage and Natural Features
Johnston County is in a diverse geologic area of the state with both upper coastal plain and lower piedmont geologies. The northwestern portions of the County are made up of rolling hills and significant slopes. Middle and eastern Johnston County begin flattening out, with wide floodplains along rivers and streams. While the geology is diverse, so is the habitat. The County’s streams and rivers are home to many endangered species, and upland areas have several endangered plants. Figure 17 shows the areas of special concern for threatened and endangered aquatic species in Johnston County.
Development in the County is designed to protect these natural features to the extent practical, building around and incorporating these features to enhance neighborhoods. Your lot may include all or a portion of these areas. Ponds, streams and wetlands are all interconnected and serve to support the exceptional diversity we have in the County!
My lot has a stream on it. What can I expect?
How can I maintain it? Streams provide habitat for aquatic species, and vegetation along the stream banks (also known as riparian buffers) serves as habitat for wildlife. Enjoy these areas in their natural states, leaving deep rooted vegetation like trees and shrubs in place along the stream banks. It’s not unusual for streams to “overflow” out of their banks during large storms. Avoid placing storage buildings and other structures near the stream. Leave the riparian buffers undisturbed on each side of the stream. Do not block the stream or divert it.
My lot doesn’t drain well.
- It could be the natural topography. Water naturally flows downhill. If your lot is at the bottom of a hill, runoff will naturally flow towards your property from uphill properties.
- Your lot may have poorly draining soils on it. If you’d like to learn about your soils, use the Web Soil Survey here: https://websoilsurvey.sc.egov.usda.gov/App/WebSoilSurvey.aspx. Enter your address and research your soils. Some soils like Rains (Ra on soils maps) or Bibb (Bb on soils maps, are naturally poorly drained or hydric soils. You can expect for these soils to generally remain wet. Plant wetland vegetation in these areas.
- The soils on your lot may be very compacted from previous construction practices. Most soils have void spaces between soil particles, allowing for the soil to act as a sponge, holding water until used by plants. Construction can alter the amount of void space in the soil, preventing water from infiltrating into the soil. Compacted soils can be renovated, however. Contact the Johnston County Agricultural Extension Service or a landscape contractor for guidance on renovating your soils.
I live close to a small pond that isn’t being maintained. Who maintains ponds?
The answer is, it depends. Some ponds are built to manage stormwater runoff. These are typically located in drainage easements, and the drainage easements, ponds, and drainage system are maintained by the developer or homeowner’s association. Check the property’s development plat to determine if the pond is in a drainage easement. Those ponds are easily maintained. However, if a pond is NOT located in a drainage easement, it is likely considered to be “Waters of the State,” which means only minimal vegetation management can be done around the pond without a permit from the state. Maintenance that can be done without a permit include:
- Removal of dead, diseased or dying trees.
- Removal of invasive plants, such as privet and honeysuckle.
- Mowing the area that is at least 30 feet from the pond’s edge. No mowing is allowed in the 30 feet closest to the pond.
More extensive management may be allowed with a permit. Find out more about Waters of the State and associated permits here: https://deq.nc.gov/about/divisions/water-resources/water-quality-permitting/401-buffer-permittingbranch/frequently
The storm took out a number of trees in the natural area near my house. Who is supposed to clean these up?
Many developments in Johnston County include natural areas and open space. Developers often set aside land for passive recreation and to provide a rural feel. These natural areas often serve multiple purposes:
- Meeting the County’s open space criteria
- Passive recreation such as walking trails
- Stormwater management areas
- Stream and wetland protection
Depending on the purpose of the natural area, a homeowner’s association may have the ability to remove downed trees. For example, trees located in common open space managed by the homeowners’ association can be removed if they are downed by storms or are diseased. However, if the natural area is on private property, only the private property owner can manage vegetation on his/her property.
If trees are downed into streams, trees can be removed by hand or equipment that does not disturb the stream banks, provided that the landowner or homeowners’ association consents to the activity. Equipment cannot go into the stream channel without a permit from the state.
I have a floodplain on my lot. What is this and what does it mean?
A floodplain is the land adjacent to rivers and streams into which the water from the river or stream can overflow. Under normal conditions, most streams and rivers stay within their channel banks. However, when storms dump rain on an area, the stream or river often leaves its banks and spills into the adjacent floodplain. Depending on development in the upgradient watershed and the amount of rain, the river or stream could only overflow a little or fully into the floodplain. There are regulations in the County and at the State level regarding activities allowed in the floodplain. For example, permits from the County are required to build a structure in the floodplain, and no development or disturbance is allowed within the 50 feet closest to the top of the stream or river bank, per State and County requirements.
Figure 16. Typical floodplain (courtesy of the City of Peachtree Corners, GA)

In developing or highly developed areas, the floodplain can change and become higher, flooding more land over time. If you are interested in learning more about floodplains, visit https://flood.nc.gov/ncflood/ or https://www.fema.gov/floodplain-management.
My lot has wetlands on it. What can I do to improve the area?
Wetlands are nature’s sponges and water recharge areas. Water is stored in the soils in wetlands and provides natural recharge relief to streams and rivers during droughts. They also provide unique habitat for wildlife. More than 70% of North Carolina’s endangered species rely upon wetlands to survive!
Figure 17. Areas of Special Concern for endangered species and critical habitat in Johnston County

References
Rain Gardens – A how-to manual for homeowners; Wisconsin DNR, clean-water.uwex.edu/pubs/raingarden; 2003.
Backyard Rain Garden – A Program of North Carolina Cooperative Extension, Revised February 2015.
New Hampshire Homeowner’s Guide to Stormwater Management Do-It-Yourself Stormwater Solutions; NH Department of Environmental Services, 2016
Page last updated: July 16, 2026